A fascinating activity for preschoolers is graphic dictations. Many useful things for the development and education of children: funny children's games, nursery rhymes, counting rhymes, tongue twisters, fairy tales, outdoor games, educational games, finger gymnastics, graphic dictations
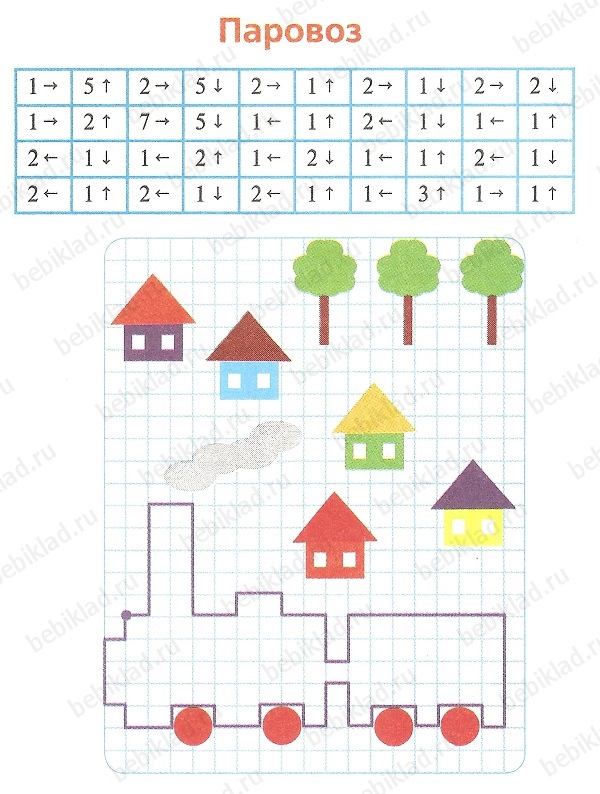
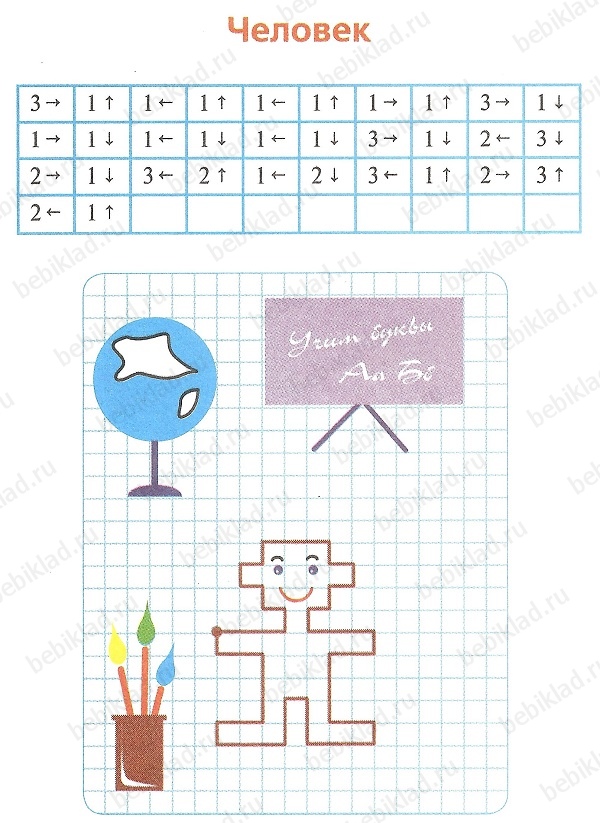
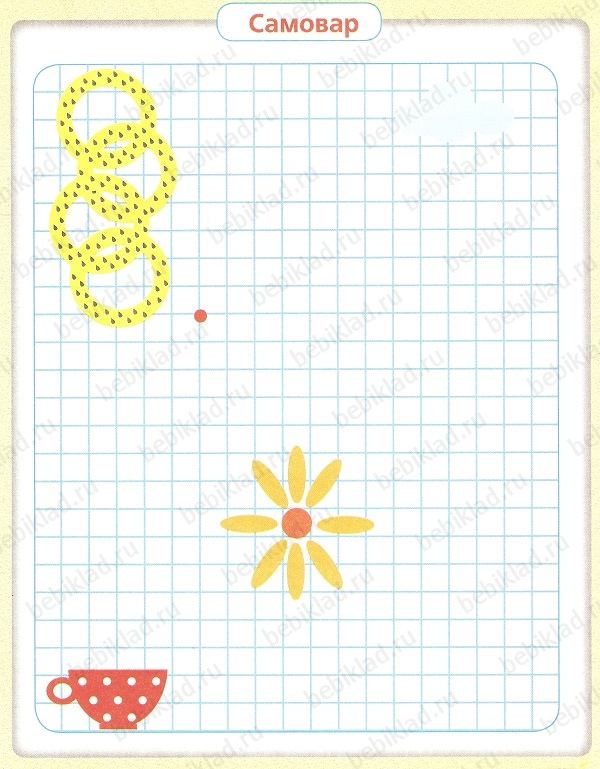
Below are cards with graphic dictations for children in color pictures. In the right column is a sheet to print and give to the child. In the left column, opposite the card with a graphic dictation for a child, there is a sheet for an adult. You need to start drawing from the point indicated in the picture. An adult calls a number that indicates the number of cells over which you need to draw a line and the direction of movement to the right or left (the direction is indicated by arrows). The result should be a drawing with an image, as in the template. Joyful and useful lessons to you!
Artists: E. Belyaeva, E.A. Timofeev.
Click on the picture and it will expand to full size. To save the dictation to your computer, click on the selected picture, then right-click, in the window that opens, select "Save image as" and specify the folder on your PC where you want to download the dictation.
| Card for graphic dictation (for children) | Card for graphic dictation (for adults) |
 |
|
 |  |
 |  |
 |  |
 |  |
 |  |
 |  |
 |  |
 |  |
 |  |
 |  |
 |  |
 |  |
 |  |
 |  |
 |  |
 |  |
 |  |
 |  |
 |  |
 |  |
 |  |
 |  |
How to perform a graphic dictation
(Rules for drawing by cells).
To begin with, on a sheet with a dictation, in the upper corners, mark marks - right and left (if the child does not already know these concepts). This is necessary in order not to confuse the child, so that he remembers which side, where and what to be. Now start the task. There is a complete image on the sheet, which should be the final result. You take this sheet for yourself, give the child a notebook sheet in a cage, a pencil and an eraser. Under the picture there are arrows pointing to the right, left, up or down. Near the arrows there are numbers indicating how many sticks to draw in one direction or another (how many cells to close in the direction indicated by the arrow). First there is a number, next to it is an arrow indicating the direction.
so you need to draw a line from the point 2 cells up,
Then 3 cells to the right and 2 cells down.

As a result, the drawing will be like this (see picture)
note that the pointers (arrows and numbers) in the tasks (provided on our website) should be read from left to right.
At the top of the picture, it is always indicated how many cells you need to step back from the edge and top in order to start the dictation. In the indicated place, for example: retreat 9 cells from the edge to the left, count 4 cells from above. In this place you need to put a bold point. Help children younger age who still do not know how to count well or independently count cells. Set a starting point (from this point the child will draw lines under dictation).
Graphic dictations that you can download for free
Click on the picture and it will enlarge in size. Click the right mouse button and in the window that appears, select the item you need (“print” or “save as”).
 Graphic dictation "Turtle". Cell drawing.
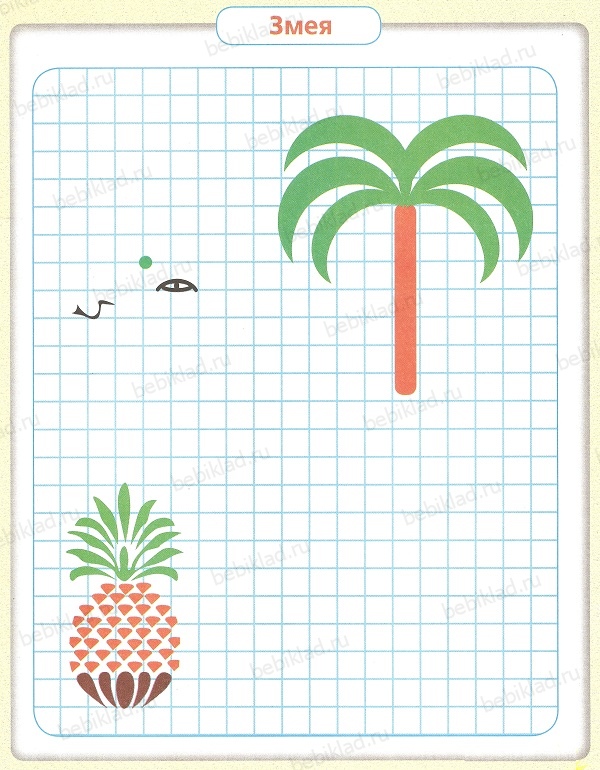
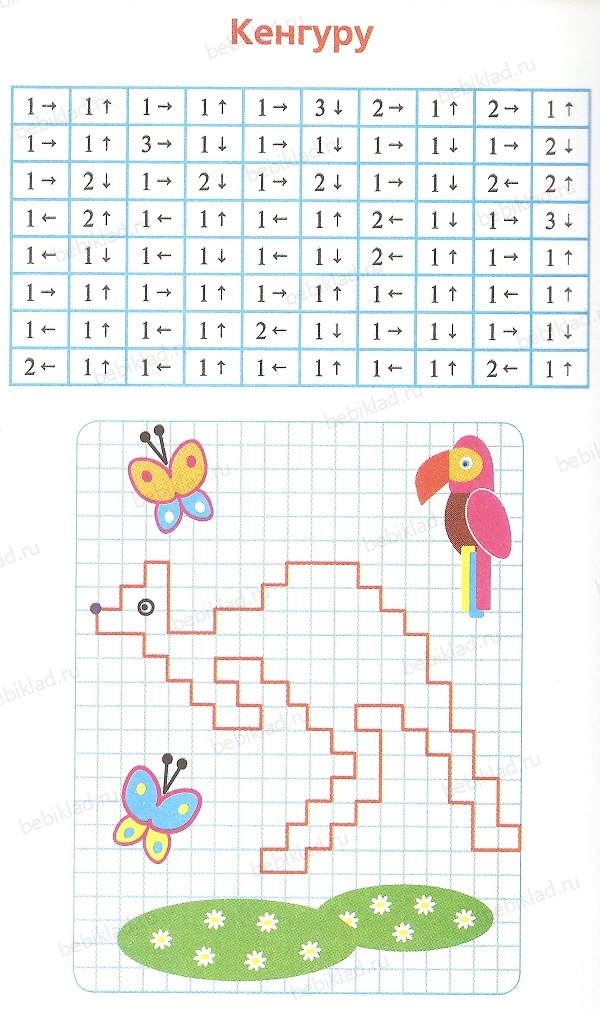
 Graphic dictation "Snake". Cell drawing.
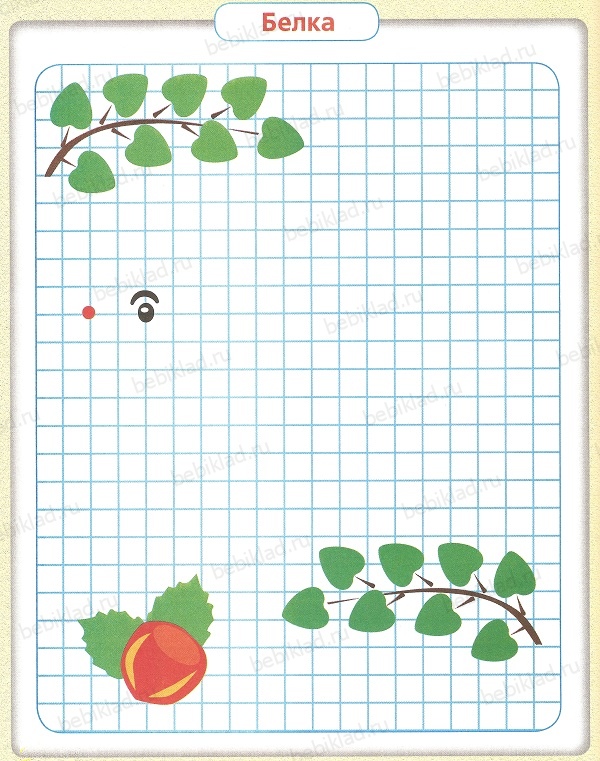
 Graphic dictation "Squirrel". Cell drawing.
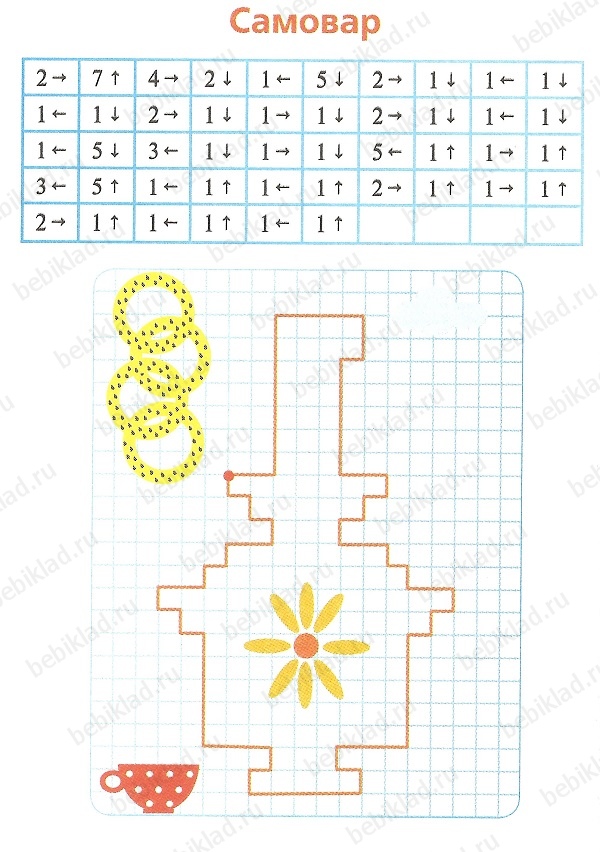
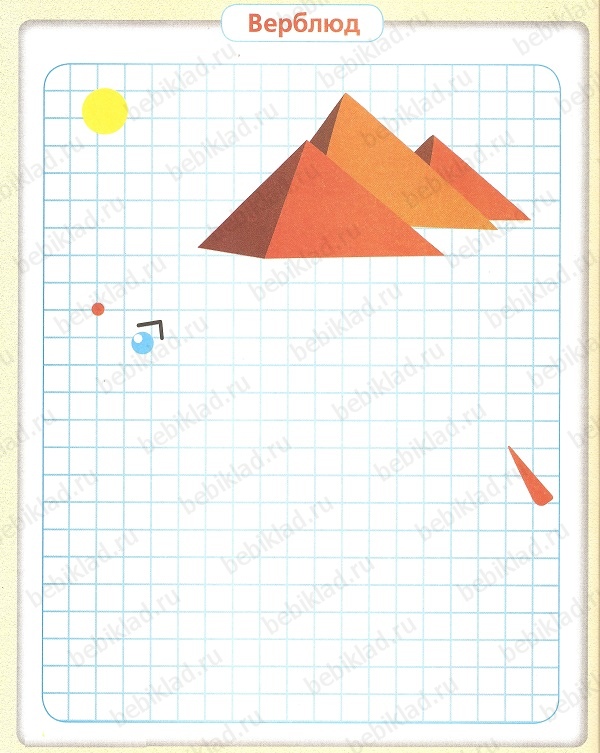
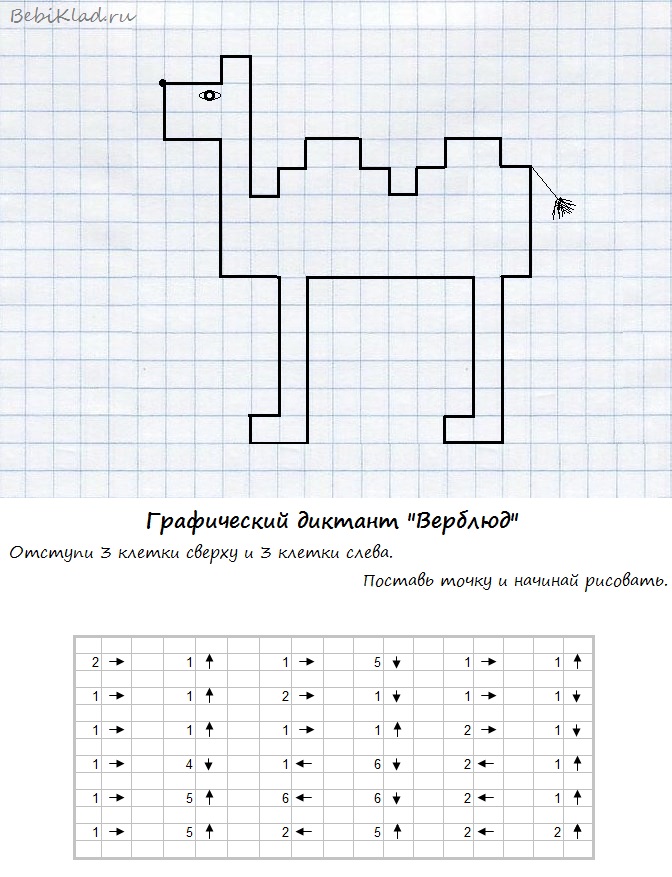 Graphic dictation "Camel". Cell drawing.
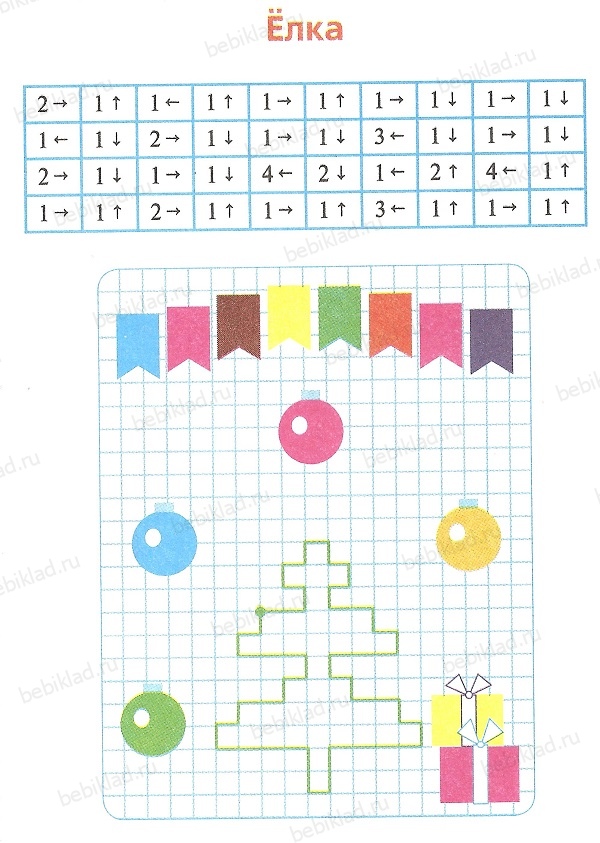
 Graphic dictation "Herringbone". Cell drawing.
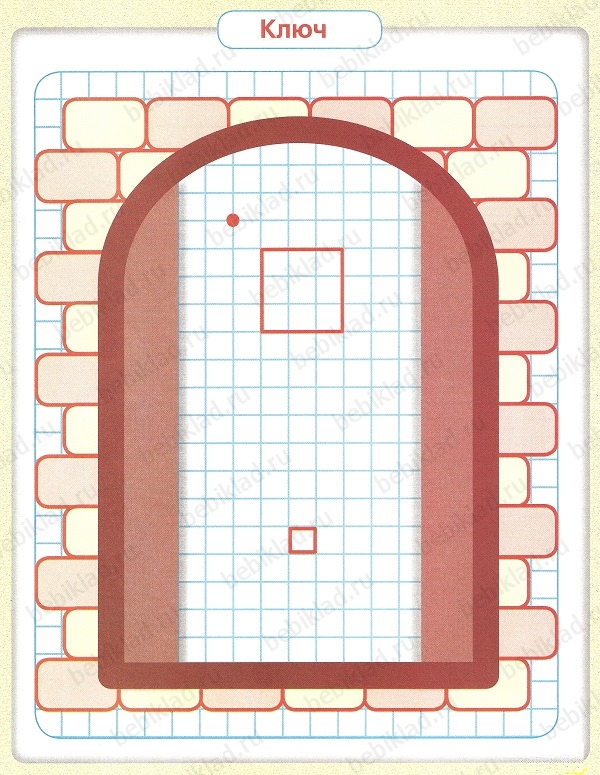
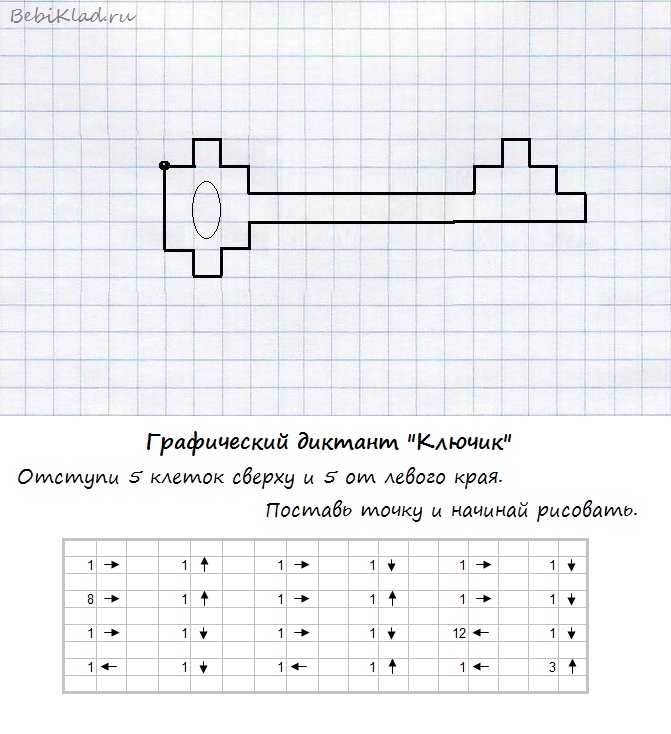 Graphic dictation "Key". Cell drawing.
 Graphic dictation "Bunny". Cell drawing.
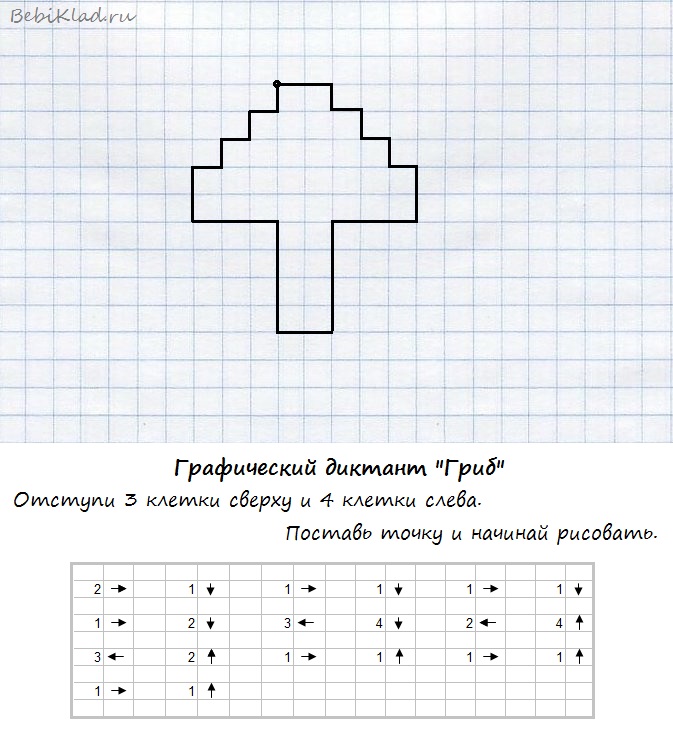 Graphic dictation "Mushroom". Cell drawing.
 Graphic dictation "Ship". Cell drawing.
 Graphic dictation "Fish". Cell drawing.
 Graphic dictation "Heart". Cell drawing.
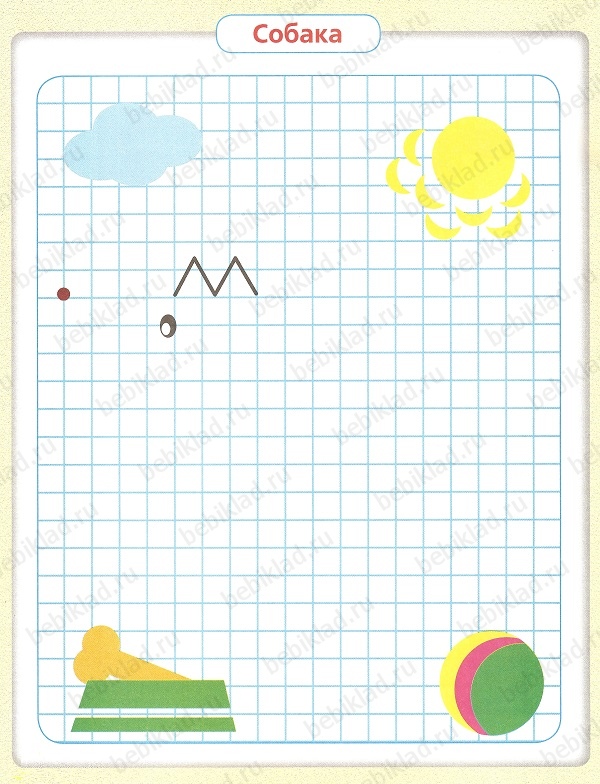
 Graphic dictation "Dog". Cell drawing.
 Graphic dictation "Sun". Cell drawing.
Preparing a child for school is a long and mandatory process. Therefore, psychologists and pediatricians recommend starting a year before the first grade, in kindergarten or at home. Since the baby needs to be prepared not only for mental and physical stress, but also moral. In general, how to do upbringing, help to become more assiduous, attentive and courageous.
If you can still morally prepare a child for big changes, by means of communication with peers in the yard and kindergarten. Then you can teach the baby to be more attentive, develop writing skills, attentive performance of certain tasks, with the help of graphic dictations and drawing by cells. Today, this incredibly popular activity has won the hearts of not only preschool children, but also teenagers. This is a way to teach the baby to write, develop logic, abstract thinking, perseverance and painstaking, as well as fine motor skills of the pens. With the help of this lesson, the child develops coordination, stability and corrects the correctness of his movements, so to speak, “fills a firm hand”, which will undoubtedly help him at school, when writing dictations and notes in a short period of time.
What are graphic dictations? Imagine in front of you a sheet of paper on which the cells are drawn. The task contains arrows (showing the direction) and numbers (showing the number of cells that need to be passed in the specified direction). If you follow the signs accurately and carefully, draw a line in the right direction for the right distance, you get an image - a picture. In other words: graphic dictations are drawing by cells, using pointers in the task.
These activities are not just for kids. preschool age, in kindergartens, but for children under 12 years of age. After all, mindfulness and coordination of movements can be developed at an older age. A fascinating activity is an entertaining leisure not only for children, but also for adults. The recommended age to start drawing graphic dictations is from 4 years old. It is at this age that the development of fine motor skills begins, with the help of drawing by cells.
Graphic dictations as an educational game are used in various places: at home, on extra classes, on vacation, at sea, in the country, and even in a summer camp. It is important to interest children, and what will do it better than such an activity. Indeed, in the end you get an unknown picture, which you can then paint with pencils or felt-tip pens. Explaining this to the baby, you can not worry about his interest in this, not so much an activity as a game that develops the imagination.
So, let's get started. First of all, you need to prepare, namely, to purchase a collection of graphic dictations. You can get them not only in specialized stores for children's books, but also in a stationery shop, second-hand bookshops. They can be downloaded for free on some sites on the Internet (for example, on our site), you can also go to paid sites. The choice of such tasks is great, choose based on the age, gender and hobbies of the child. For kids who are just starting classes, it is best to choose graphic dictations (drawing by cells) depicting bunnies, cats, dogs. For girls: princesses, flowers. But, you can start with simple geometric shapes: squares, triangles, prisms. So you will immediately teach the child and coordination of movements, improve the motor skills of the pens, develop perseverance and attentiveness, and tell about the names and types of geometric shapes. For boys, dictations with the image of cars, animals, robots, castles, funny little men are suitable. The easiest graphic dictations, with simple shapes and performed in one color, are for beginners. Complicated tasks - for older children. Choose graphic dictations on a topic that is interesting to your child. If the baby is into music, use drawings musical instruments, treble clefs and sheet music.
If you have already done cell drawing with your child, start adding variety to your activities. That is, at 5-6 years old, you can perform dictations that help develop even more. That is, get drawings with those animals that the child has not yet seen and does not know what they look like. Use colors that the baby has not yet learned very well. Expand your child's horizons in this way, let him increase and replenish his vocabulary with new words, teach them, find out where they can be applied. The main thing is good mood, enthusiasm and positive attitude of the crumbs before performing any task. Under such conditions, study will indeed be incredibly useful, fruitful and not straining the child.
After a selection of graphic dictations, start preparing. Remember that the child must be praised for a job well done. Even if the picture is not yet obtained, there is no need to constantly prompt, direct and compare with other children. You need to guide and push in the right direction. To do this, first of all, you need to teach the child where the left side is, where the right side is. Show me where is the top and where is the bottom. This simple and ingenuous knowledge will help you perform all graphic dictations with 100% accuracy.
Sit near a table with a level and smooth surface so that the child can sit evenly and correctly in the chair. Pay attention to lighting. Tip: if you want to teach your child to a school notebook, give him the opportunity to get used to it, learn how to navigate, prepare graphic dictations on a sheet, just like a school notebook. Now prepare a simple pencil and a diligent eraser so that the wrong strips can be easily removed and the same dictation can be continued again. Prepare yourself a pencil and an eraser.
It is worth keeping track of time so that the child does not get tired, so that the hands and eyes rest. Although if the baby is not tired, wants to continue and finish the work now, there is no need to pick up the dictation, the child will decide when enough is enough.
There is a time frame for working with graphic dictations
For children 5 years of age - a maximum of 15 minutes. For older children, up to 6 years - a maximum of 20 minutes (from 15 minutes). For first-graders (6 or 7 years old) - a maximum of 30 minutes, a minimum of 20 minutes.
Drawing by cells is a great way to teach your baby to a pencil and a pen. Teach how to hold it correctly, practice so that the fingers are not so tired of holding the subject at school. This exercise will help you teach your baby to count correctly, as he will need to count the exact number of cells before starting the lesson.
And so: before you lies the task of a graphic dictation, a pencil. In front of the child is a piece of paper in a cage or a notebook, an eraser and a simple pencil. On the sheet of the child, with or without your help, is shown in the indicated place, the starting point. Explain that from this point they start drawing lines (right, left, down and up), in the direction and with the number of cells that you name. Now proceed, next to the named task, and they are indicated in a line, put a dot with a pencil so as not to forget where you finished the dictation, not to confuse the child and, of course, yourself. Watch what the child is doing. Tell me if the baby is confused where the left and right sides are. Count together, if necessary, the number of cells.
For example, you have a figure, the most standard is a house. Tell the kid what kind of drawing you will end up with, or keep it a secret for even more interest. From the point you need:
1 → - 1 cell to the right
Dictate clearly, the child should perceive everything by ear. At the end of the work, look at how much the baby's figures coincide with the given elements. If the baby is wrong, find out together exactly where. Erase extra lines with an eraser, starting from the point of failure, and continue drawing. It is important to keep the child in a good mood during the learning process.
Oksana Anishkevich
An important moment in everyone's life child is going to school. To adapt child was the most successful, it requires the presence of certain skills and abilities. One of the most difficult skills for a first grader is to work in a notebook in cage. Very important teach a child use a notebook navigate the sheet, be able to see cage, correctly find its sides, corners, center and midpoints of the sides. This work contributes to the development of fine motor skills of the hands, will help to kid in the future, it is beautiful to write numbers and letters, perform graphic tasks in notebooks.
Start teaching children orientation on a sheet of paper in a cage necessary already at the senior preschool age. You can also do this work at home. What do you need to know and remember parents?
To organize this work, you will need a notebook in cage, simple pencil, eraser. For children 5-6 years old, it is better to use a large notebook cage. The duration of one lesson should not exceed 20-25 minutes. But if the child got carried away, do not stop it and interrupt the lesson.
During training, the mood is very important. child and friendly attitude of an adult. Remember that classes are for child is not an exam, but the game. Your job is to help to kid in a playful way to master the necessary skills. So never scold child. If something does not work, then explain how to do it right. At the initial stage, pronounce each step, explain, help him complete tasks, praise even the smallest successes.
Pay attention to posture child. Both hands should be on the table left hand supports the notebook and moves it up as the page fills up. Light should fall from the left side, and for left-handed children - from the right. Do not allow the notebook to rotate, only the hand should change position.
Get started by getting to know the notebook. Explain that a notebook consists of a cover and sheets. On the cover, they usually write the last name and first name of the person who owns the notebook, and some other information. Everyone has it sheet two sides are pages. They write, draw, draw on them.
Then look at the notebook page. Straight lines are drawn on it from top to bottom and from left to right, which form identical squares - cells. Offer to identify the right, left, top, bottom sides of the page; show where the top left, top right, bottom left, and bottom right corners are located. To consolidate this knowledge, offer the children the following exercise: "Draw a circle in the upper left corner, a square in the upper right corner, a triangle in the lower left corner, a rectangle in the lower right corner, and an oval in the center of the page."
To form the ability to see the working line (horizontal row cells) draw with a simple pencil the top and bottom borders of the line and suggest to kid paint it yellow.

Suggest to color the next line in blue and explain that the lines on the page are arranged from top to bottom and you need to write in them from left to right.
Then, in the highlighted line, circle cells with one interval.

Draw on a simple sheet of paper one cell and offer to find the center cells, sides (right, left, top, bottom) and their midpoints, corners (top right, top left, bottom right, bottom left).

After that, invite the children to first put dots on the working line in the middle of each cells, then after one, after two cells. Further, without highlighting the working line, please put dots in the center cells, in the middle of the side cells, at the intersection of the lines.

After you taught the child to see a cell on a sheet of paper, its sides and corners, move on to drawing vertical and horizontal straight lines in one or two cells top to bottom or left to right.

Inclined straight lines and combinations of them;
Arcs, wavy lines, circles, ovals;
Drawing objects of complex shape;
Graphic dictation.
Graphic dictations start with the simplest images and gradually move on to more complex ones. The assignments use the following designations: number of counted cells are numbered, and the direction is indicated by an arrow.
Before starting work with a graphic dictation, put a large red dot in your notebook, from which child will begin to build a figure.
The first graphic dictation can be next:
You speak: Place the tip of the pencil on the red dot. Without lifting the tip of the pencil from sheet, draw a line to the right by 2 cells. Without lifting your pencil, draw a line down 2 cells. Without lifting the pencil, draw a line to the left by 2 cells. Without lifting your pencil, draw a line up 2 cells. Connected lines. What happened? Square. Well done!
Thus, having gone through all the stages of work, you can not only teach a child to navigate on a sheet of paper in a cage, but also develop voluntary attention, spatial imagination, fine motor skills of fingers, coordination of movements and perseverance.
In your work, remember to adhere to the following rules:
Be sure to explain each task
Work calmly, without reproaches and censures,
Don't rush child,
Try to find something to praise him for,
Complicate tasks only when the previous ones have been successfully completed;
Work systematically
Don't get distracted while working
Pay attention to posture child, location sheet of paper,
Don't Overwork child.
Spending half an hour a day on a child, it is possible to take him to the first grade prepared and not feeling lagging behind other children. Good luck!
Related publications:
Advice for parents "How often to praise a child?" Children should be praised often, but not thoughtlessly. Appropriate praise should not only bring joy to the child, but also educate him. When you praise
Advice for parents "How to teach children to read poetry expressively" Advice for parents: "How to teach children to expressively read poetry"
Advice for parents "How to teach a child to speak beautifully" Educator: Dorman Elena Alexandrovna. Do not be nervous if the child speaks incorrectly. There is a natural and active process.
Advice for parents "How to teach a child not to offend others" When toddlers begin to walk and meet peers in different situations, they can offend other children without any malicious intent.
Appendix 4
Rules for working in notebooks:
1. With a straight seat, the child should rest his chest on the table.
2. The distance from the edge of the table to the chest should be no more than 3-4 cm.
3. The distance between the eyes and the child's notebook is 30-33 cm.
4. Both hands lie on the desk, only the elbow joint protrudes slightly beyond the edges, the left hand supports the notebook and moves it up as the page fills.
5. Light should fall from the left side.
6. For left-handed children, the light should fall on the right.
We should try to teach children to check their posture on their own. For this, sandbags are used (see photo), which are placed on the head, trying to hold. This creates a straight posture. Children should realize the importance of correct posture for health, physical development and performance, which is especially important for the successful mastery of writing skills.
Taking into account the problem of left-handed children and ambidrexes, it is necessary to explain the tasks to them in more detail, give them a smaller task, divide tasks into parts, give tasks of reduced difficulty. All children are offered 2 notebooks:
In a large cell (notebook No. 1)
Notebook of S. Gavrin, N. Kutyavin, I. Toporkov, S. Shcherbinin “We are preparing a hand for writing” by famous psychologists (notebook No. 2)
Work with the first notebook is arranged in the following sequence :
1. Getting to know the notebook (cover, sheet, page)
2. Acquaintance with the page.
3. Acquaintance with the cell.
4. Acquaintance with the string.
5. Performing exercises in the cage (see Appendix).
Work with the second notebook is built taking into account the tasks, united by the main requirement: to complete the task strictly according to the condition:
1. Color pictures without going beyond the contours;
2. Hatch only in the indicated direction;
3. When working, do not turn the notebook “do not twist”.
Figure 9
At first, the quality of performance (correctness and careful observance of all conditions) is important, and not the speed and quantity of the child's work.
Conditions for the correct completion of tasks in notebook No. 2 : the child works no more than 15 minutes; at the same time, the correct location of the notebook is selected and in the future the notebook does not rotate - only the hand changes its position! The sequence of tasks - from the first to the last, without "jumping"; after completing each task, a mandatory analysis of the result obtained is carried out together with the child; for each success of the child, it is necessary to praise him and encourage him. Figure 10
All tasks in notebooks are selected taking into account the unstable attention of children, taking into account the complexity of the task, and alternate according to the interests of the children.
Task for notebook number 1
Exercise 1. Introduction to the notebook
Purpose: To introduce children to the notebook, to learn to navigate in the notebook (cover, sheets, pages)
Task 2. Introduction to the cell.
Purpose: To introduce children to the cell.
Exercises: A cage is a house. A house has a floor, walls, and a ceiling, and a cage has a floor, walls, and a ceiling.
a) Draw one cell (on a plain sheet without cells)
b) Draw many cells, one after the other (on the same sheet)
Task 3. Cell game.
Purpose: Learn to navigate in the cage (center of the cage, corners, sides) Exercise:
a) Find the center in the cell (selection of the center of the cell throughout the entire line) b) Find the upper left corner (selection of the corner in the cells throughout the entire line) c) Find the lower right corner (selection of the corner in the cells throughout the entire line)
lines)
d) Find the sides of the cell (right, left)
e) Find the "floor and ceiling" of the cell
f) Draw the cell completely (draw a "house" through one cell)
Task 4. Line Purpose: Introduce the concept of "line" Exercise: Draw straight line lines at the bottom and top.
Task 5. Cell Walking
Goal: Learn to navigate the cells.
An exercise:
a) Walking through the cells with fingers.
b) Walking through the cells with a pen.
Through the cage
After 2 cells
After 3 cells, etc.
Task 6. Working with a cell
Purpose: To learn how to work with the cell.
Exercise: Inscribing different shapes, elements within the cell, using hatching in different directions.
Task 7.
Purpose: same.
Exercise: Inscribing rounded objects inside the cage (you can use hatching in a circle)
Task 8.
Purpose: To learn to work within the borders and line by reference points.
An exercise:
a) I Bringing long and short lines
b) Connecting dots in the indicated direction.
Task 9. Hatching.
I (spruce: Learn to work within boundaries.
Exercise: Drawing lines inside an object.
Task 10.
Purpose: To fix the position of the hand to depict objects in a cage, develop an eye, learn to observe the interval (“we walk” through the cage)
Exercise: Writing individual elements or a pattern “We all live in houses and look out the window”
Task 11.
Purpose: same.
Exercise: Alternating large and small elements (straight and rounded).
Task 12. Develop an eye, train in writing elements with a loop at the top, bottom.
Target: same.
Exercise: Tear-off writing with a loop “Birds are sitting on a branch”, “Leaves are flying”.
It is very difficult to teach a child to navigate on a notebook sheet, while developing handwriting, accuracy and, most importantly, to teach him to write. Repeated and long writing leads to unwillingness to learn, robs the child of all the joy of learning. But in kindergarten, where there is a lot of time in the classroom and there are no strict requirements for the child and academic performance limits, you can teach children not only to navigate on a notebook sheet and not be afraid of a notebook, but also to hold a pencil and pen correctly, strengthen the small muscles of the hand and develop fine motility.
Graphic dictations, conducted in an interesting, playful way, have the opportunity to contribute to the development of all of the above.
Fragment of a math lesson in grade 3 (school of type VIII):
Working with older preschool children preparatory group, I applied several techniques and forms of graphic dictations that I developed while still working at school and where they brought tangible results and significant support in the development of writing, counting, motor skills, etc. My goal was primarily:
- development of fine motor skills of hands;
- development of the concepts of "left / right", "top / bottom";
- strengthening counting skills;
- development of attention;
- development of the imagination;
Along the way, we made observations of the position of the sun in the sky throughout the day, so the children still:
- developed observation;
- expanded knowledge of nature.
Stage 1. Preparatory work. Consolidation of knowledge of the left and right hand
We take a landscape sheet and fold it in half in height, bending the sheet from left to right (the next day - from right to left), equaling the edges. The sheet bent in this way is bent again, but already from top to bottom (then from bottom to top). The result is a rectangle. Let's deploy it. We have a sheet of 4 rectangles. We draw along the folds with a pencil. In the future, we begin to use a ruler for this. We count the rectangles, paying attention to the fact that we have two rectangles on the right and left, and two rectangles on the top and bottom.
Stage 2. Tasks
Draw a circle in the lower right rectangle, a triangle in the lower left, a square in the upper right, and a triangle in the upper left.
Stage 3. Observations of the sun
Where is the sun in the morning? Show. Name (lower left rectangle). Happy? Show. Name (upper left). After sleep? Show. Name (upper right). I'm going for a walk. Show. Name (bottom right).
Stage 4. Complication of tasks
Put a red dot in the middle of the lower left rectangle, a blue dot in the upper right corner of the lower right rectangle. We perform this work in stages: show the lower right rectangle with your finger, now find the upper right corner in it, put a dot there with a blue pencil.
Stage 5. Observations of the sun
We draw the sun different time days, looking out the window. The window is also divided into rectangles.
I note that this work was carried out by me for only 4 months, almost every day, in various forms of complexity. But, nevertheless, 2 weeks after the first lesson, we began to work in squared notebooks. By that time, the children already had the concept of a cage and were a little oriented on a piece of paper.
We draw the lines "by hand", along the notebook lines according to my samples. I drew samples for everyone. You can use entertaining game moments of preparation: large colored cells, various figures that children circled with pencils of different colors, etc.
Before starting work with a graphic dictation, draw a large visual sample on the board, put a large red dot in each notebook. Start working: 3 cells down, 3 cells to the right - this is an auditory sample, a reference point from which we begin to “dance”, build a figure.
The first graphic dictation.
The figure is a cage. I say: put the tip of the pencil on the red dot. Without lifting the tip of the pencil from the sheet, draw a line to the right 2 cells. Without lifting your pencil, draw a line down 2 cells. Without lifting your pencil, draw a line to the left 2 cells. Without lifting your pencil, draw a line up 2 cells. Connected lines. What did we get? Square. Well done.
Take a red pencil, circle the square along the drawn lines and paint over it.

We performed simple figures every day until the children were no longer afraid of the sheet. I took the material to start work from the manual “Developing hands - to learn and write and draw beautifully”, authors S.E. Gavrina, N.L. Kutyavina, I.G. Toporkova, S.V. Shcherbinin. (Yaroslavl, "Academy of Development", "Academy and K", 2000).

- Do not put a red dot, indicating the start of work.
- Perform not one, but 2-3 figures.
What was the result on the part of the children? Children began to confidently navigate the notebook sheet. They tried to clearly follow my instructions, listened to me carefully. They were very interested to know what would happen as a result of the dictation, what figure.
We have already marked the path of the sun as follows:

And they said this: In the morning the sun is in the lower corner of the lower left rectangle, then it rises to the upper right corner of the upper left rectangle. After lunch, the sun begins to sink down to the middle of the upper right rectangle. Before an evening walk, it descends further down to the lower corner of the lower right rectangle.
The result of such work with a group of preschoolers was that almost all graduate children were not afraid to work in a notebook, they began to understand that it was necessary to work in a notebook not in an arbitrary place on the sheet, they began to confidently hold a pencil and a pen, did not confuse the right and left sides, learned note the weather. They also improved their attention and began to develop their imagination, they became interested in studying at school.
In the form of a dictation, they are a game for children of preschool and school age. Drawing by cells, the child learns to navigate on the sheet, build logically the direction of movement of the line of the hand. He also learns to fix angles on cells and develops logical and spatial thinking.
Graphic dictations can be divided into 3 parts, when children complete tasks by drawing in the cells on their own or under dictation:
- The child must repeat the image in his notebook, counting the cells that are presented in the sample.
- In case 2, the child circles the cells under dictation, listening to the teacher. He must tell in which direction the child needs to move the handle, how many cells to pass.
- Self-dictation - the child has an instruction where the task is described. There are also hints about how many cells to draw in which direction.
As a rule, the numerical designations of steps are used in tasks. Next to them are arrows orienting the child in space. It is important that during these math games the children had a good mood and a desire to solve an example, having received a beautiful drawing. The task of an adult is to help the child in an unobtrusive way to learn the possibilities of arithmetic operations.
Stages of conducting classes
It is worth noting that almost all dictations are complemented by relaxing games, tongue twisters and finger gymnastics for relaxation.
In the course of classes, children develop clear speech, develop fine motor skills of their hands and work out concentration on those things that require increased thoughtfulness - features of objects, replenishment vocabulary(riddles for the resulting drawings).
The tasks are structured so that the child can solve examples “from simple to complex”. According to the principle of the graphical method, children quickly and easily memorize a sequence of numbers, develop orientation in the direction of movement.
 Before conducting a graphic dictation, the teacher explains the essence of the task
 To conduct classes you need:
- The main stage is the conversation between the teacher and the children. It is necessary to explain the task, rules and features of the game.
- The teacher asks to leave only a notebook in a cage, a pencil and an eraser on the desk in case the child lost his way or did not have time to finish the step.
Preschool children are given checkered notebooks up to 0.8 mm (large), so that it is convenient to concentrate on finger movement. Small cells are too "complicated" for strokes and drawings, so kids 5-6 years old need to ensure the comfort of the process itself.
Below is an example of a graphic dictation for a child of 4-5 years old:
| Stages | Step 1 | Step 2 | Step 3 | Step 4 | Step 5 | Step 6 | Step 7 | Step 8 |
| Block 1 | Right 1 | Up 3 | Right 2 | Up 1 | Right 1 | Down 3 | Right 6 | Up 1 |
| Block 2 | Right 1 | Up 1 | Right 1 | Down 2 | Left 1 | Down 4 | Left 1 | Down 2 |
| Block 3 | Left 3 | Up 1 | Right 1 | Up 1 | Left 2 | Down 1 | Left 1 | Down 1 |
| Block 4 | Left 2 | Up 1 | Right 1 | Up 2 | Left 1 | Top 1 | Left 3 | Up 1 |
The result should be a picture of a dog:

The duration of the dictation is no more than 10 minutes. for preschool children 4-5 years old. For kids 6-7 years old, the dictation lasts 20 minutes, since the tasks are more difficult, as a rule. And at school, children are given such classes long as a whole lesson. In this case, the game cannot be interrupted.
If there are left-handers among the children, it is worth explaining that the left and right are in the same directions as usual. For some kids, there is a hint - you can put dots after the cells are counted.
Before starting classes, you need to do finger gymnastics and at the same time explain to the children the following points:
- Each animal has a schematic interpretation - similarity with reality and what will end up on the sheet.
- Photos may differ from each other, as well as coat colors, beak sizes. And the pattern of the figure is always the same.
- In a graphic dictation, it is important to observe the order of the cells - you can’t jump over 1, stray or draw “on your own” if someone didn’t have time to do something.
 In a graphic dictation, it is important to observe the order of the cells
 Schematic drawings have distinctive features:
- hares have long ears;
- elephant - big round ears;
- The ostrich has a long neck.
In this case, the shapes of a circle or oval are displayed schematically, taking into account square cells. An example is a mosaic, which also shows shaping from non-circular hole outlines.
Graphic drawings by cells should be done after the teacher's introductory speech, a conversation with the class (a group of children) and preparation:
- Let the child pick up the ball and toss it several times.
- Further, for each syllable of the tongue twister (pure tongue twister), the baby must catch the ball. This is how a sense of tact develops, an understanding of sequence. The kids won't be in a hurry.
 Finger gymnastics contributes to the correct execution of a graphic drawing
 - The ball can be replaced by clapping - for each syllable, the child makes a clap.
- Finger gymnastics allows you to prepare children for the task. So that the kids do not interrupt, while reading and telling tongue twisters, you can distribute sheets and pencils.
- Next, you need to explain the game plan so that the children are not afraid to be late with the work.
- Before starting, you should read the conditions of the game several times, and then use an example to show what can happen if you follow all the points correctly and consistently.
Before dictating a task to children, you need to ask them to put a full stop - this is the beginning from where the drawing will “grow”. It is important that the dot is not on the edge or in the middle of the drawing, which takes up a lot of space on the work surface.
Drawing by cells for children (diagrams and templates)
Graphic dictation can be done in a group, as well as on individual lessons with kids.
If in the second case it is quite easy to choose the desired drawing, then in the first case the teacher must select the children by age (extracurricular activities).
For preschoolers (5-6 years old)
The child should sit at the table and listen carefully to the teacher's tasks. First, it is worth saying the conditions and explaining the essence of the whole task. Kids 5-6 years old already know how to distinguish shapes, colors, explain the choice of colors, speak in a structured way about the possibilities of a drawn hero.
Children in adolescence are talented, and it is important to help them discover their abilities, and not “kill” the sense of beauty. Therefore, in no case can not be scolded. The child must understand that he has the right to stray, to lag behind other peers, and nothing will happen to him for this - this is a game where there are no strict rules that apply to the behavior or individual abilities of the individual.
 For a graphic drawing, you will need a sheet in a box, a pencil and an eraser
 For work, children will need:
- pencil;
- eraser;
- a sheet of paper in a large cage;
- task example.
If the baby has gone astray, you need to tell him to continue from where he left off. As a rule, towards the end of the dictation, many can already determine the type of animal or image by the figure. Someone finishes the figure himself - there is no need to scold for this.
Graphic drawings by cells are carried out as follows:
- The teacher says: "put a dot in the upper left corner." This will be the beginning of the drawing.
- Next, you need to dictate, without repeating, each step, giving the child 10-15 seconds. for contemplation.
- The simplest figures are those that can be drawn according to the tasks "golden key", "bunny" and "elephant".

To draw an "elephant" you should go through the following steps:
- put a dot in the upper left corner;
- go 4 cells to the right, 1 down, 5 to the right;
- then 8 cells down, 3 left, 3 up, 1 left, 3 down, 3 left;
- at the end 4 cells up, 1 left, 2 down, 1 left, 1 down, 1 left;
- and for the trunk - 2 cells up, 1 to the right, 6 up.
For the "Golden Key" quest:
- put a dot in the middle of the sheet and count 8 cells to the right from it;
- from the 8th cell: 2 up, 4 to the right, 5 down, 4 to the left, 2 up;
- 4 left, 4 down;
- 1 left, 1 up, 1 left, 1 down, 1 left;
- 3 up, 1 left, 1 up.
To make it clearer and more convenient for the child, you can offer a drawing scheme for good example, placing it in front of the child's eyes on the table.

This is especially convenient for drawing a "bunny":
- First you need to step back from the edge of the sheet 5 cells on the right and 3 on top.
- From the set point, you can start drawing: 1 cell to the right, 3 down, 2 to the right, 2 down, 1 to the left.
- Then draw 2 cells down, 3 to the right, 3 down, 1 to the left, 1 up.
- For paws: 1 left, 2 down, 1 right, 2 down, 2 right, 1 down, 6 left.
- Then for the tail: 1 up, 1 left, 1 up, 1 right, 12 up.
The result is a hare in profile, which fills the right side of the sheet. At the beginning of the dictation, the children were able to step back, and the drawing turned out. This is important to note, otherwise the child will not understand why certain actions were performed. For each drawing, you can come up with names, poems, stories.
At home, give the children a task - to figure out what color the drawing will be, how best to depict it. Also, smart kids will like to invent dictations on their own according to ready-made drawings.
For schoolchildren 7-8 years old
Numerical dictations adapt children well to school - they better understand arithmetic, mathematical tasks.
Children of 7 years old learn orientation in space, independence in performing important tasks. AT primary school the teacher must establish contact with each child and, in order to understand his level of preparation, graphic dictations can be given as tasks.
Children learn better:
- They learn to decipher riddles and solve problems.
- The child already knows how to navigate the knowledge base, relying on school curriculum.
- Dictation helps to teach kids to listen and listen to the essence of tasks.
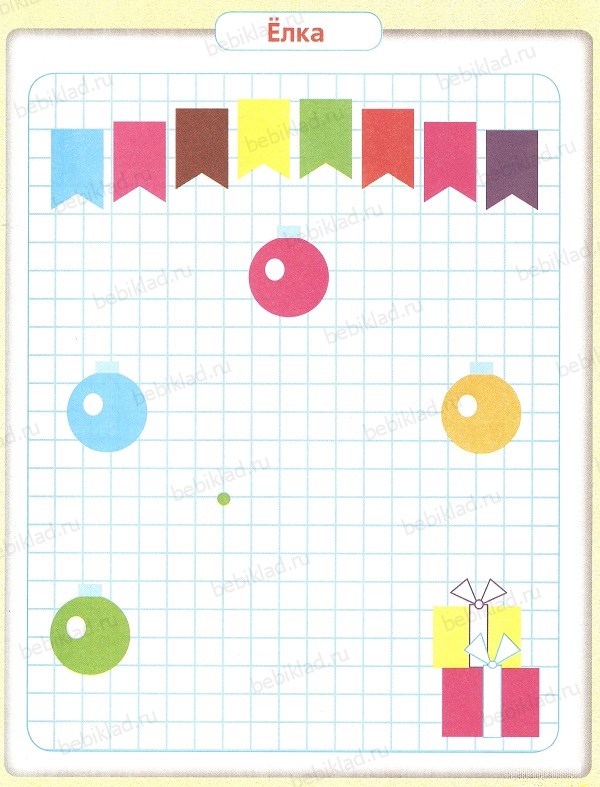
The most interesting tasks for schoolchildren are tasks of the "Christmas tree" type. Before starting, you need to put dots on student sheets, and then dictate the task or issue a task template. It should contain numbers and arrows indicating the direction of the line. In this case, 1 step is equal to 1 arrow.
 When performing graphic dictations, it is important to understand the meaning of the arrows
 It is also important that children understand:
- The vertical and horizontal planes are indicated by arrows to the right and left.
- Arrows obliquely - this is the movement of lines diagonally.
- For each correct task, you need to praise, for diversion of attention - scold. So the child will observe discipline and not be distracted by peers or extraneous activities.
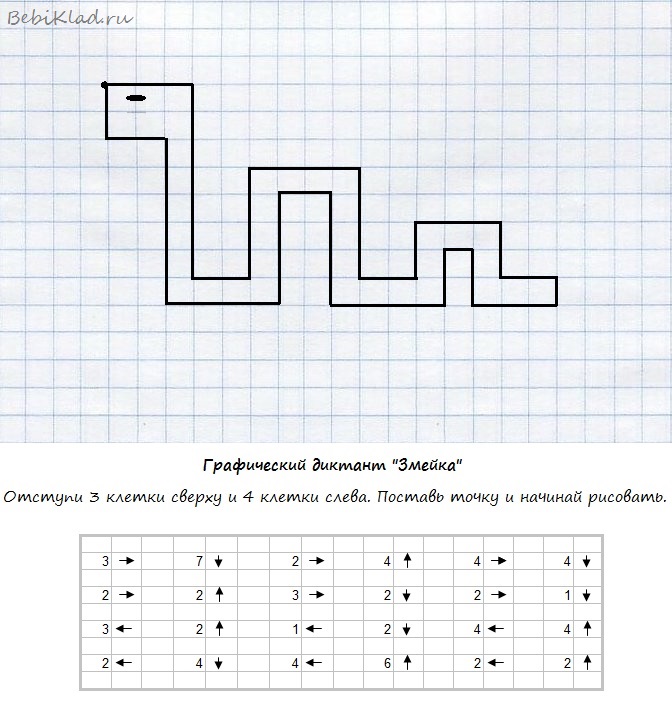
To complete the task, you need to prepare paper and a pencil:
- First you need to specify how much indent is needed from the edge of the paper.
- Then you can proceed to the execution: 3 cells to the right, 11 down, 2 to the right, 5 up.
- Then 3 cells to the right, 5 down, 1 to the right, 3 up, 3 to the right, 3 down, 1 to the right.
- Then 3 up, 2 right, 1 down and 1 left.
- Then the drawing goes to completion: 3 down, 3 left, 3 up, 1 left, 3 down, 3 left.
- Then 5 up, 1 left, 5 down, 4 left, 9 up, 2 left and 3 up.
The result is a snake.

For clarity, children can be given schematic tasks:

The duck should be in the center of the sheet.

The house can be drawn with parents as homework.

A Christmas tree with 2 tiers is a little more difficult to perform, so it’s better to invite the child to read the task on their own at home, and then draw a dictation in the class after training.

This drawing is interesting for its scale: a large figure fits on 1 sheet, which can then be painted.
Older children (finishing the 2nd grade) can be given tasks in the schemes:

After finishing the giraffe, you can color it to your taste. The child must also pick up colors and, without going beyond the contours, make a smooth transition from light to dark.

And this dictation will be an excellent task for a child of 8-9 years old. As you can see, in each figure there is a point that needs to be transferred to the notebook yourself. Only from it can a job be started, since an offset can lead to line interruption.
For children 9-10 years old
Children in grades 3-4 already know the features of constructing figures, they can work with geometric data, calculate the parameters of objects (equations). As homework, you can give examples online. There is a service that provides such an opportunity for schoolchildren. Together with parents or siblings, such tasks will seem easy.

To draw a crab, you need to follow these steps:
- Retreat 4 cells from above and the same number to the left;
- Draw 2 up, 1 right, 1 down, 2 right, 1 up, 1 right;
- 2 down 1 left, 4 down, 1 right, 1 up, 3 right, 1 down and 2 right;
- 1 up, 3 right, 1 down, 1 right and 4 up;
- 1 left, 2 up, 1 right, 1 down, 2 right, 1 up, 1 right, and 2 down;
- 1 left 5 down, 2 left, 1 down, 4 right, 2 down 1 left, 1 up and 1 left;
- 2 down and 2 right, 2 down and 1 left;
- 1 up, 2 left, 1 down, 1 right and 1 down;
- 2 left, 1 up and 10 left;
- 1 down, 2 left, 1 up, 1 right, 1 up, 2 left, 1 down, and 1 left;
- 2 up, 2 right, 2 up, 1 left, 1 down, 1 left and 2 up;
- 4 right, 1 up, 2 left, 5 up and 1 left.
As you can see, the figure is symmetrical, and upon reaching the middle of the task, the child can already schematically move in the mirror direction. This allows you to develop thinking and abstract perception.
Symmetric (mirror) drawing by cells
Graphic drawings by cells can be performed without an additional task - you need to rely not on numbers and arrows, but on the image itself.
AT this case, presented below, the child sees an unfinished house, which is made schematically. The cells will prompt in which direction to move, how many cells to draw in one direction or another.

Such activities are interesting for older children who already understand what mirroring and symmetry are. That is, if the drawing is folded in half, then you get ½ of the entire image, which means that you need to mirror those lines that are already on the sheet.

The drawings are different, and here it makes no sense to indicate the scheme of the direction of movement of the hand. The child understands at what distance the square is removed, how to repeat it in a mirror image, so that in the end a symmetrical “analogue” of what is in front of the eyes is obtained.
Graphic drawings should develop the thinking of children, help them better master the school curriculum. No wonder such games can be found on the Internet, to deal with the whole family. If drawing by cells is not possible, the child may have other interests - artistic interpretation, attraction to music, or indifference to other sports / activities.
The main thing is that the school minimum does not cause a negative reaction, then mathematics will be a joy not only in the 1st, but also in the 10th grade.
Video about graphic drawings
Graphic drawings by cells - robot: