Learning to draw masterpieces with a pencil
Probably, each of us at least once in our lives had a desire to draw something that everyone else would like. This happens especially often when you look at the paintings of famous artists, and you see how everyone around them admires them.
It seems to you that there is nothing difficult in taking a sheet of paper, pencils or other art supplies and drawing your artistic masterpiece. But when it comes to the implementation of this idea, then you have a lot of difficulties and problems: either the place on the sheet was chosen incorrectly, or the proportions and scale were not guessed, then individual details do not work out, and immediately, all the desire to draw something disappears .
Remember that even the most eminent artists, the paintings were far from the first time.
Each of them has come a long way to improve their skills and please us with their creativity. This was preceded by days, months and even years of hard training and constant sketching. After all, to learn to draw well, continuous practice is needed.
You should get in the habit of always carrying a notepad and a small pencil with you, and sketching any objects you like whenever possible. Only through perseverance and hard work, you can achieve any heights in the visual arts.
But what if, apart from your desire and some drawing abilities, you have nothing else?
Where to begin?
To begin with, it should be remembered that of all art supplies, a pencil is the most convenient tool for beginner artists.
This is due to the fact that it is very easy to erase, and in case of a blot, everything can be fixed very quickly. In addition, there are several varieties of pencils, with which you can effortlessly make your drawing perfect. How can you learn to draw with a pencil on your own?
So, the most important advice for beginners is to never undertake to draw large and complex compositions until you learn how to draw each detail separately. Most likely, you will not succeed, and this will discourage you for a long time from picking up a pencil a second time.
First, learn how to draw one object. To do this, you need to distinguish it from other objects with your eyes. Then visually determine its size and shape. After that, you need to imagine where on your sheet it will be most convenient to place it, taking into account the size and shape of this item.
It should be remembered that tall objects are best placed along the length of the sheet, and wide objects along the width.
You also need to take into account that the object you are depicting is most likely larger than your sheet, and therefore you will need to draw it, observing the scale and proportions. For a novice artist, this will be quite difficult to do.
Therefore, in order to develop the necessary skills for you, we offer you some simple, at first glance, exercises. They will help you learn how to allocate the right place for a drawing on a sheet of paper, and this is practically the basis for building any images, since this is where any drawing begins.
Special exercises
In these exercises, we will depict objects in the form of diagrams, without drawing small details. The most important thing for you is to see with what simple shapes you can draw a given object, as well as take into account its proportions and dimensions. Having received this skill, in the future you will automatically correctly determine the size and place for the picture.
So, the first exercise is that you will draw an object not from nature, but from a finished drawing. This will greatly simplify your task, since you do not need to select an object from the rest and place it correctly on a sheet of paper - everyone has already done this for you. You just need to repeat all this, but always in a different size, so as not to turn everything into a banal copying process.
We will depict a mountain. To begin with, you need to carefully consider it and mentally imagine it on your sheet of paper. After that, draw a straight line that will serve as the basis for the mountain.
Then you need to consider the shape of the mountain, are its slopes equal or not? In our case, this is a mountain with identical slopes, so it can be depicted as a regular cone, the height of which is less than the width of the base.
How to determine how many times they differ from each other?
With the help of a ruler, you would have done this very quickly, but the most important thing for you is to learn how to determine the size by eye. In the finished drawing, the mountain is depicted in a ratio of 1: 3, i.e. its base is three times its height.
To correctly determine the proportions of your drawing, you first need to build the top of the mountain. You need to find a place on the horizontal line where it will be. To do this, we need to postpone three identical segments on our straight line.
After that, find the middle and build a perpendicular. Then mark the top at a distance of one division from the base. If your drawings match, then you did everything right. Now try to draw this mountain in a different size. And so several times.
Remember that in order to correctly determine the proportions of the object you are depicting, you always need to start by dividing the base into equal parts, and then start from this.
Thanks to this exercise, you will always learn to accurately determine the relationship between the different parts of the object you are depicting, and this is the basis of drawing.
The second exercise is that you will need to draw a mountain in which the ratio of height and width is 1:4, and its top is tilted to the right. This is more difficult to do than in the first case, but nothing is impossible.
To begin with, do as in the first exercise: draw a straight line, divide it into equal parts (in this case 4). Then there is a nuance - the top is not in the middle of the segment. Take a closer look, it is located just above the third mark, which means that you need to build a perpendicular from it. After that, lay off the top of the mountain. Most often, when drawing any objects, the base is divided into 2, 3, and less often by 5.
The third exercise consists in depicting several mountains with different peaks in height and location in one profile picture at once. But don't worry, it's not as difficult as it seems. You need to imagine each mountain separately, mentally drawing dotted lines to the base. And then everything will be clear to you, and all that remains is to repeat the first exercise three times.
Also a very important skill for a novice artist is the ability to build perfectly straight lines by hand without the help of special tools. It's not as easy as it seems at first glance. To learn this, you need to constantly train.
Draw a vertical line with a ruler, and try to draw lines that are as parallel to it as possible with your hand. Do the same with the horizontal line. From the first time you are unlikely to get a perfect masterpiece, but over time the lines will come out more and more straight and parallel to each other.
Mastering hatching
When drawing with a pencil, you also need to be able to correctly hatch volumetric objects in order to show the places where light and shadow fall. It is best to start with simple shapes such as a sphere, cube, cylinder, or cone. Also, if you look closely at these figures, you will notice that they have areas of penumbra.
In order for you to get a smooth transition from light to penumbra and darker areas in the drawing, you need to use pencils of different hardness for this. Having mastered this skill, you can easily depict any three-dimensional objects, and they will look realistic.
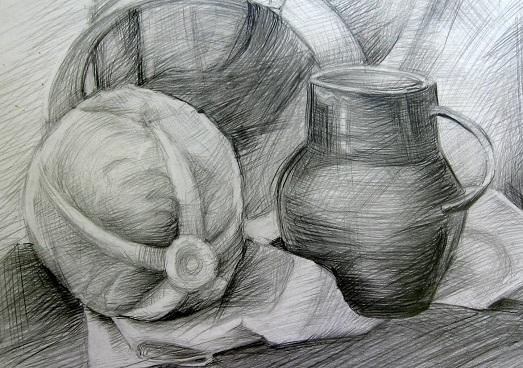
If you quickly and without problems perform all these exercises, then you can practice your skills on other objects of a simple form, for example, draw a jug or. And after that, you can move on to more complex drawings, such as images of flowers, birds and various animals.
Let's draw a person
If you have achieved some success in this, then the next level for you is to draw a person. To do this is not very easy. We will tell you how to depict an adult on a piece of paper in stages. First, try to draw it in a standing position, as it is very important for you to see the proportions.
Start by drawing a vertical line from which you will build off when building a grid of a person, i.e. the main lines of the head, shoulders, waist, hips, legs and arms.
But what size should these lines be? If you are drawing from life, then you can use your pencil as a measuring tool. For example, you need to measure the distance from the head to the waist - you take a pencil, and visually align its tip with the top of the head, and then mark on it with your thumbnail where the waist is. After that, transfer this size to a piece of paper. Thus, you can measure anything.
But in order to check yourself, you must know that the body of an adult can be visually divided into 8 parts. The size of one part corresponds to the size of the head. body length
in men, it is approximately “three heads”, the boundaries are on the chin, chest, waist and crotch line. The legs form "four heads", with the middle at the knees. The width of the shoulders is two whole and one third of the "head". The length of the arms is three and a half "heads". In women, the proportions are slightly different - the body is longer, and the widest part is the hips.
If you have already decided on the proportions of the person you are depicting and put the appropriate marks on your sheet, then you can start shaping it. To do this, draw all parts of the body using ovals and cylinders. If you are satisfied with the resulting figure, then you can draw the outline of a person.
After that, you will only have to indicate some details, for example, folds on clothes, draw fingers, hair, face, etc. - Your drawing is ready.
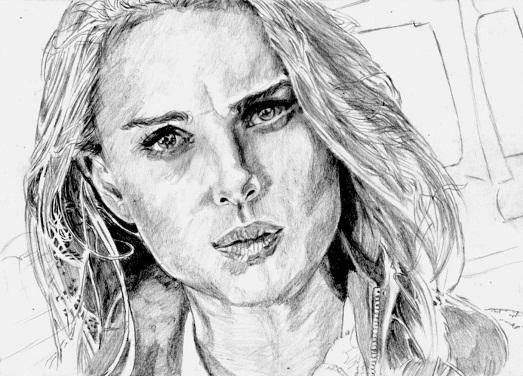
beautiful portraits
The most difficult thing in depicting people is portraits. Their complexity lies in the fact that in order to achieve similarity with the original, you need to correctly draw absolutely all facial features. For beginners, this will be quite difficult to do.
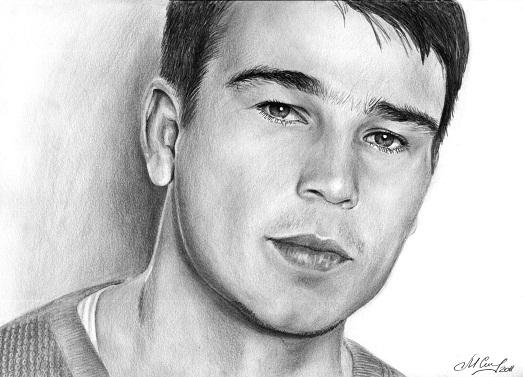
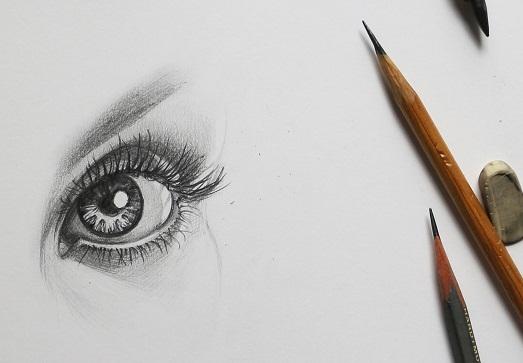
Therefore, the main advice for them is to learn how to draw separately different parts of the face: cuts of the eyes, shapes of the nose and lips from different angles. After that, already move on to the image of portraits. At first, it is better to copy them from a photograph, as this can take a lot of time, and not every sitter will be able to pose for you.
So where to start? First, draw the outline of the head. Then draw the central vertical axis. She will divide the face into symmetrical parts. After that, divide it in half using a horizontal line - this is the line where the eyes will be. The eyebrows should be level with the top of the ears.
The length of the nose is determined in this way: divide the distance between the line of the eyes and the line of the chin in half - this will be the tip of the nose. Its width corresponds to the distance between the inner corners of the eyes. These proportions, of course, are not a dogma, but in most cases, all faces can be drawn with their help.
After you have decided on the location of the parts of the face, you need to draw the contours of the eyes, nose, lips, ears, and hair. If everything suits you, then you can proceed to their detailed drawing. After that, it remains to add only a few finishing touches - indicate the places of illumination and shadow in the picture, and your portrait is ready.
graffiti style
If you prefer drawings with images of various inscriptions, all kinds of shapes, etc., then you better turn your attention to graffiti. There are several styles. And in order to decide in which style you want to create, you must get to know all of them and try which one suits you.
Beginners first need to practice on a piece of paper. Write any word with a pencil. The spacing between the letters should correspond to half the height of the letter, as they will be outlined. After that, give each letter volume and bulge with the help of light and shadow, as well as color intensity. Color the letters and circle their outlines again. And your graffiti is ready.
Choosing tools
A very important role in creating any drawings is played by the tools and paper that you use. What kind of pencils do you need to make your drawing perfect?
There are several varieties of them. Simple pencils can be of different softness and hardness. Most often they are designated using the English classification, where "B" is the softest pencil, "H" is the hardest, and "HB" is a hard-soft pencil. In addition, next to these letters you can see numbers from 2 to 9 - they indicate the shade of the color of the pencil.
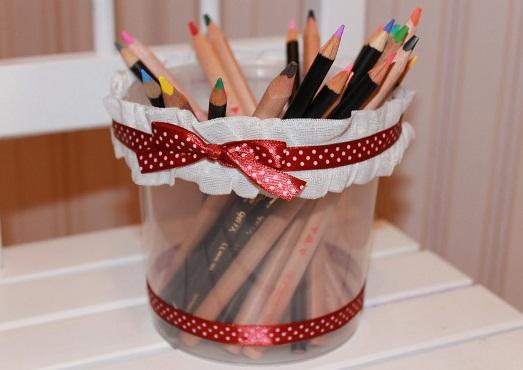
A beginner artist will only need a few pencils of varying hardness and softness. Also, when drawing with a pencil, it is very convenient to use a good soft eraser. These tools will help you when creating any image.
What paper do you draw on also plays a very important role? It is best to use thick white paper. It should withstand all your corrections. For a pencil, grainy paper is most suitable, since any shades of a simple pencil will be very clearly visible on it, and it will be much easier for you to draw all parts of the shadow and penumbra.
So, you now own almost all the information that, we hope, will help you in creating your artistic masterpieces!